今回は軽い修正です。
買い物リストで「場所」のグルーピング表示のとき、「無し」が先頭に来ていたのを最後尾に移動しました。
あとはレイアウトの微修正です。
ウィジェットのサイズは3x1が基本ですが、それ以外にしてもそれなりに表示されるようにしました。
テキストのサイズを変更する術が無いので、そこは目をつぶってください。
あとは幅指定を忘れていた部分があったので、そこの直しです。
これからは新作アプリに力を注ぎたいので、こっちの更新はさらにペースが遅れそうですが、
見捨てずにお付き合い下さい。
手が圧倒的に足りない。。。
2011年3月11日金曜日
2011年3月4日金曜日
Library used - "Shopping necessary for us now"
"Shopping necessary for us now" uses OpenCSV under Apache 2.0 License.
Usage of Widget - "Shopping necessary for us now"
Here, I explain the widget.
 |
| Widget |
When you add this application's widget to Home Screen, the widget like the image is displayed.
That size is 3x1.
That size is 3x1.
(1) The number of the checked items in the Shopping List Screen. The text color is red when all items are not checked, and is black when all items are checked.
(2) The number of the items in the Shopping List Screen.
(3) The Shortcut for the Shopping List Screen.
(4) The Shortcut for the Catalog Edit Screen.
If you want a shortcut for the Menu Screen, add the launcher icon next to the widget.
(2) The number of the items in the Shopping List Screen.
(3) The Shortcut for the Shopping List Screen.
(4) The Shortcut for the Catalog Edit Screen.
If you want a shortcut for the Menu Screen, add the launcher icon next to the widget.
Let's Use Memo - "Shopping necessary for us now"
Here, I explain the memo function.
You can set the following attributes to each item.
(1) Guide Price : The all-time low of the item or the maximum price limit that you may buy, etc.
(2) Place : A shop or an area where you buy it.
(3) Expiration Date: the best-before date or the use-by date.
(4) One-Time Memo : This is a memo erased when the shopping ends. Input a data needed only for the next shopping. (For example, "SALE at Apr.1, buy 5")
(5) Memo : Describe brand name and regular sale information, etc. freely. (For example, "20% off every Tuesday")
Then, Let's use it.
1. Using in the Catalog Edit Screen
 |
| Catalog Edit Screen |
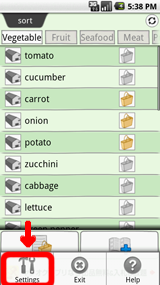
Press the Menu key at the Catalog Edit Screen.
Select "Settings" in the menu.
Select "Settings" in the menu.
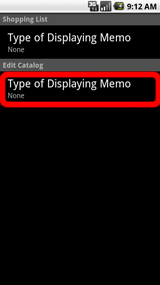 |
| Settings Screen |
Change "Type of Displaying Memo" in "Edit Catalog" Category to "Text".
 |
| Catalog Edit Screen |
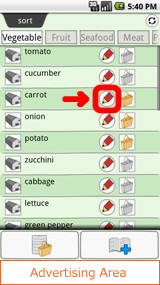
"Memo Input Button" of each items should be displayed when returning to the Catalog Edit Screen by the Back key.
Then, push any of these.
Then, push any of these.
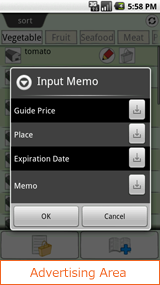 |
| Memo Input Dialog |
The Memo Input Dialog like the image is displayed.
The input dialog for the attribute opens when you push "Input Button" to the right of the attribute.
put some value there, push the OK button, and push the OK button of the Memo Input Dialog.
The input dialog for the attribute opens when you push "Input Button" to the right of the attribute.
put some value there, push the OK button, and push the OK button of the Memo Input Dialog.
 |
| Catalog Edit Screen |
the memo is displayed under the item name.
Repeat this operation for the items to which you want to set the memo.
Repeat this operation for the items to which you want to set the memo.
 |
| Memo Display (Text) |
Each attribute is arranged like the image.
(1) Guide Price
(2) Place
(3) Expiration Date
(4) Memo
(1) Guide Price
(2) Place
(3) Expiration Date
(4) Memo
Here, you might think One-Time Memo is where.
One-Time Memo is only displayed and editable in the Shopping List Screen. This is for the mis-input prevention.
Please refer to the next paragraph "2. Using in the Shopping List Screen" for details.
One-Time Memo is only displayed and editable in the Shopping List Screen. This is for the mis-input prevention.
Please refer to the next paragraph "2. Using in the Shopping List Screen" for details.
 |
| Memo Display (Icon) |
When "Type of Displaying Memo" change to "Icon" on the Settings Screen, icons like the image are displayed instead of text.
The icon is colored when the value is set, and the gray when not set.
Use favorite one either the text display or the icon display.
Use favorite one either the text display or the icon display.
2. Using in the Shopping List Screen
 |
| Catalog Edit Screen |
The usage in the Shopping List Screen is almost the same as the Catalog Edit Screen.
When you change "Type of Displaying Memo" in "Shopping List" Category to "Text", the Memo Input Button of each items should be displayed.
When you change "Type of Displaying Memo" in "Shopping List" Category to "Text", the Memo Input Button of each items should be displayed.
 |
| Memo Input Dialog |
However, there are two differences with the Catalog Edit Screen.
One is to be able to display and edit One-Time Memo.(1)
Anoter is not to be able to edit the memo though can be displayed. (2)
This purpose is to prevent the mistake that erase the memo by inputting it in the One-Time Memo field.
You can input memo in the Catalog Edit Screen, and can input One-Time Memo in the Shopping List Screen.
Be mindful of this.
 |
| Memo Display (Text) |
The memo display of the text becomes like the image on the Shopping List Screen.
The point is
It is a point the One-Time Memo's being displayed.
The point is
It is a point the One-Time Memo's being displayed.
(1) Guide Price
(2) Place
(3) Expiration Date
(4) One-Time Memo
(5) Memo
(2) Place
(3) Expiration Date
(4) One-Time Memo
(5) Memo
 |
| Memo Display (Icon) |
It is the memo display of the icons. The icon of the One-Time Memo is displayed.
3. Input in the Item Entry/Edit Screen
You can input memo in the Item Entry/Edit Screen.
Editable attributes are same as the Catalog Edit Screen. (Guide Price, Place, Expiration Date, Memo)
Editable attributes are same as the Catalog Edit Screen. (Guide Price, Place, Expiration Date, Memo)
Backup/Restore Function - "Shopping necessary for us now"
Here, I explain the Backup/Restore Function.
The backup function of This application output data to a CSV file.
The restore function restore data from the file.
Use this at the following time.
(1) Before greatly changing the catalog (The re-doing is able even if it makes a mistake)
(2) When you uninstall this application program once (I'll be waiting for your return.)
(3) When you change the smartphone (As export/import function)
(4) When you want to give your catalog to someone (As export/import function)
The object of the backup is only data of items, categories, and memo.
Settings of each screen ("Type of Display Memo" and order of sorting, etc.) is not included.
Other notes exist in "3. CAUTION". Please use this function after often reading that and understanding the content.
Then, let's try.
1. Backup
 |
| Menu Screen |
Press the Menu key at the Menu Screen, and select "Backup/Restore".
 |
| Backup/Restore Dialog |
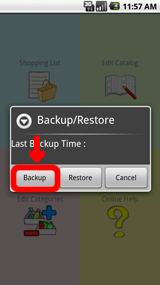
"Backup/Restore Dialog" is displayed.
"Last Backup Time" is blank at first.
Push "Backup Button".
The confirmation dialog is displayed, and when you push the OK button, the CSV file is written.
The CSV file is created at "(Root of SD card)/ymgcsng/shp.csv".
The root of SD card is "/sdcard" or "/mnt/sdcard" according to the model.
"Last Backup Time" is blank at first.
Push "Backup Button".
The confirmation dialog is displayed, and when you push the OK button, the CSV file is written.
The CSV file is created at "(Root of SD card)/ymgcsng/shp.csv".
The root of SD card is "/sdcard" or "/mnt/sdcard" according to the model.
2. Restore
 |
| Backup/Restore Dialog |
Again, select "Backup/Restore" from menu and display the Backup/Restore Dialog.
"Last Backup Time" is displayed at this time.
Push "Restore Button".
The confirmation dialog is displayed, and when you push the OK button, the CSV file is read.
When reading the file finishes, data returns to the one at the time of the backup.
"Last Backup Time" is displayed at this time.
Push "Restore Button".
The confirmation dialog is displayed, and when you push the OK button, the CSV file is read.
When reading the file finishes, data returns to the one at the time of the backup.
3. CAUTION
(1) The object of the backup is only data of items, categories, and memo. Settings of each screen is not included.
(2) Categories of the same name are merged as the same category.
If you want to use the category of the same name by all means, change into the alias once before it backs up, and return it to former name after restoring.
(2) Categories of the same name are merged as the same category.
If you want to use the category of the same name by all means, change into the alias once before it backs up, and return it to former name after restoring.
4. Edit and Import (Advanced)
AS the backup file is a CSV file, it is possible to edit it with the CSV editor and the text editor.
Therefore, to register a lot of items, it can be easier to edit the CSV file directly than registering one by one from the application program.
However, take great care when you edit the CSV file so that the data edit by the hand work may cause no mismatch of data.
+Procedure
(1) Send the file "(Root of SD card)/ymgcsng/shp.csv" to a PC etc.
(For example, File synchronization software between a PC and a smartphone, File Manager Application for android, and so on)
(2) Edit the CSV file with a PC.
* The file encoding is UTF-8.
(3) Send the edited file to a Android device and put it to "(Root of SD card)/ymgcsng/shp.csv".
* If you change the file encoding at (2), return it to UTF-8.
+Attribute
+NOTICE
(1) Don't replace it because the order of the column is fixed.
(2) The first head line is skipped as a header. (However, the number of columns is checked.)
Don't delete the first line.
(3) Now, Warning about the line that was not able to be read doesn't be displayed.
(4) The date format is different by locale.
The following table is an part of them.
Therefore, to register a lot of items, it can be easier to edit the CSV file directly than registering one by one from the application program.
However, take great care when you edit the CSV file so that the data edit by the hand work may cause no mismatch of data.
+Procedure
(1) Send the file "(Root of SD card)/ymgcsng/shp.csv" to a PC etc.
(For example, File synchronization software between a PC and a smartphone, File Manager Application for android, and so on)
(2) Edit the CSV file with a PC.
* The file encoding is UTF-8.
(3) Send the edited file to a Android device and put it to "(Root of SD card)/ymgcsng/shp.csv".
* If you change the file encoding at (2), return it to UTF-8.
+Attribute
| Attribute | Format | Notes |
| Item Name | Text | Required. If this is blanck, this line is ignored. |
| Add to Shopping List | Number | Set "1" if it is displayed in the shopping list. |
| Regular Stock | Number | Set "1" if its stock is controled. |
| Stock Amount | Number | circle:2 triangle:1 cross:0 |
| Is Bought | Number | Set "1" if it is checked in the shopping list. |
| Default Position | Number | order in its category (from 0) |
| Guide Price | Number | |
| Place | Text | |
| Default Position of Place | Number | order when not sorting (from 0). The first one is used when there is a default position different in the same place. It is tail when blank. |
| Expiration Date | Date | refer to NOTICE(4) |
| Memo | Text | |
| One-Time Memo | Text | |
| Category | Text | "***" when blank |
| Default Position of Category | Number | order when not sorting (from 0). The first one is used when there is a default position different in the same category. It is tail when blank. |
+NOTICE
(1) Don't replace it because the order of the column is fixed.
(2) The first head line is skipped as a header. (However, the number of columns is checked.)
Don't delete the first line.
(3) Now, Warning about the line that was not able to be read doesn't be displayed.
(4) The date format is different by locale.
The following table is an part of them.
| locale | Format | Sample(year:2011 month:March day:1st) | |
| United States | M/D/YY | 3/1/11 | |
| United Kingdom | DD/MM/YY | 01/03/11 | |
| Germany | DD.MM.YY | 01.03.11 | |
| Italy | DD/MM/YY | 01/03/11 | |
| Chile | DD-MM-YY | 01-03-11 | |
| Australia | D/MM/YY | 1/03/11 | |
| Greece | D/M/YYYY | 1/3/2011 | |
| Korea | yy. M. d | 11. 3. 1 | |
| Spain | D/MM/YY | 1/03/11 | |
| Netherlands | D-M-YY | 1/03/11 | |
| Croatia | YYYY.MM.DD | 2011.03.01 | |
| France | DD/MM/YY | 01/03/11 | |
| Croatia | YYYY.MM.DD | 2011.03.01 |
ウィジェットの使い方 - 「今僕たちに必要な買い物」
ここでは、ウィジェットについて説明します。
|
| ウィジェット |
ホームスクリーンにウィジェットを追加すると、画像のようなウィジェットが表示されます。
大きさは3x1が基本です。
大きさは3x1が基本です。
(1) 買い物リスト画面でチェック済みの数です。まだ未チェックのものがあると赤、全てチェック済みだと黒になります。
(2) 買い物リスト画面にある品物の数です。
(3) 買い物リスト画面へのショートカットです。
(4) カタログ編集画面へのショートカットです。
もし、メニュー画面へのショートカットも欲しい場合は、ウィジェットの隣にランチャーアイコンを追加してください。
(2) 買い物リスト画面にある品物の数です。
(3) 買い物リスト画面へのショートカットです。
(4) カタログ編集画面へのショートカットです。
もし、メニュー画面へのショートカットも欲しい場合は、ウィジェットの隣にランチャーアイコンを追加してください。
メモを活用しよう - 「今僕たちに必要な買い物」
※注意事項
画像中の言語は英語になっていますが、これは英語版マニュアルと同じ画像を使用しているからです。
言語設定が日本語になっていれば、日本語で表示されます。
ここでは、メモ機能について説明します。
品物ごとに以下の項目を設定することができます。
(1) 目安価格:その品物の最安値や購入してもいい上限価格などを設定しておくと便利です。
(2) 場所:その品物を購入するお店や地域が決まっていれば、それを入れてください。
(3) 有効期限:食品の賞味期限や、薬の消費期限などを入れます。
(4) ワンメモ:1度買い物を終えると消えるメモです。次の買い物のときだけ必要な内容を入力してください。(例:4/1 特価、5個買う)
(5) メモ:商品名や定期的な安売り情報など自由に記述してください。(例:毎週火曜日2割引)
それでは、早速使ってみましょう。
1.カタログ編集画面で使う
|
| カタログ編集画面 |
カタログ編集画面で、Menuキーを押してください。
表示されたメニューの「設定」を選択します。
表示されたメニューの「設定」を選択します。
|
| 設定画面 |
設定画面が表示されるので、「カタログ編集」の「メモ表示のタイプ」を「テキスト」に変更してください。
|
| カタログ編集画面 |
Backキーでカタログ編集画面に戻ると、各品物ごとに「メモ入力ボタン」が表示されるはずです。
では、そのうちのどれかを押してみてください。
では、そのうちのどれかを押してみてください。
|
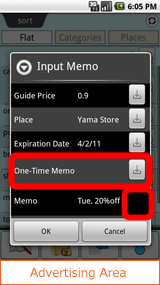
| メモ入力ダイアログ |
画像のようなメモ入力ダイアログが表示されます。
設定したい項目の右にある「入力ボタン」を押すと、その項目を入力するダイアログが開きます。
そこで好きな値を入れてOKボタンを押し、さらにメモ入力ダイアログのOKボタンを押してください。
設定したい項目の右にある「入力ボタン」を押すと、その項目を入力するダイアログが開きます。
そこで好きな値を入れてOKボタンを押し、さらにメモ入力ダイアログのOKボタンを押してください。
|
| カタログ編集画面 |
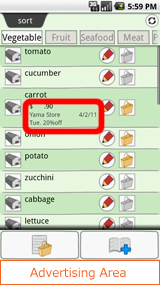
品名の下にメモの内容が表示されていますね?
これを、メモを設定したい品物に対して繰り返してください。
これを、メモを設定したい品物に対して繰り返してください。
|
| メモ表示(テキスト) |
各項目は、画像のように配置されます。
(1) 目安価格
(2) 場所
(3) 有効期限
(4) メモ
(1) 目安価格
(2) 場所
(3) 有効期限
(4) メモ
ここで、「おや?ワンメモは?」と思うかもしれません。
ワンメモは買い物リスト画面でのみ、表示と編集が可能です(誤入力防止のためです)。
詳しくは、次節の「2.買い物リストで使う」を参照ください。
ワンメモは買い物リスト画面でのみ、表示と編集が可能です(誤入力防止のためです)。
詳しくは、次節の「2.買い物リストで使う」を参照ください。
|
| メモ表示(アイコン) |
設定画面で「メモ表示のタイプ」を「テキスト」ではなく「アイコン」にすると、画像のような表示になります。
値が設定されている場合は色がつき、設定されていない場合は灰色です。
テキスト表示とどちらか好きな方を使用してください。
テキスト表示とどちらか好きな方を使用してください。
2.買い物リスト画面で使う
|
| 買い物リスト画面 |
買い物リスト画面での使い方も、カタログ編集画面と同じです。
設定画面で「買い物リスト」の「メモ表示のタイプ」を「テキスト」にすれば、各品物にメモ入力ボタンが表示されます。
設定画面で「買い物リスト」の「メモ表示のタイプ」を「テキスト」にすれば、各品物にメモ入力ボタンが表示されます。
|
| メモ入力ダイアログ |
ただ、カタログ編集画面との違いが2つあります。
1つは、(1) ワンメモが表示されて編集できること。
もう1つは、(2) メモは表示だけで編集できないことです。
これは、メモを間違えてワンメモに入れてしまい、消えてしまったということが無いようにするためです。
カタログ編集画面ではメモを入力でき、買い物リスト画面ではワンメモを入力できる。
このことを覚えておいてください。
1つは、(1) ワンメモが表示されて編集できること。
もう1つは、(2) メモは表示だけで編集できないことです。
これは、メモを間違えてワンメモに入れてしまい、消えてしまったということが無いようにするためです。
カタログ編集画面ではメモを入力でき、買い物リスト画面ではワンメモを入力できる。
このことを覚えておいてください。
|
| メモ表示(テキスト) |
買い物リスト画面では、テキストのメモ表示は画像のようになります。
ワンメモも表示されているところがポイントです。
ワンメモも表示されているところがポイントです。
(1) 目安価格
(2) 場所
(3) 有効期限
(4) ワンメモ
(5) メモ
(2) 場所
(3) 有効期限
(4) ワンメモ
(5) メモ
|
| メモ表示(アイコン) |
アイコン表示の場合です。ワンメモのアイコンも表示されます。
3.品物登録/編集画面で入力
品物登録/編集画面でもメモの入力ができます。
入力できる項目はカタログ編集画面と同じです(目安価格、場所、有効期限、メモ)。
入力できる項目はカタログ編集画面と同じです(目安価格、場所、有効期限、メモ)。
2011年3月3日木曜日
バックアップ/リストア機能 - 「今僕たちに必要な買い物」
※注意事項
画像中の言語は英語になっていますが、これは英語版マニュアルと同じ画像を使用しているからです。
言語設定が日本語になっていれば、日本語で表示されます。
ここでは、バックアップ/リストア機能について説明します。
このアプリのバックアップは、データをCSVファイルに出力します。
リストアは、そのファイルからデータを復旧します。
次のようなときに使うと便利です。
(1) カタログを大幅に変更する前(間違えてもやり直しが効く)
(2) 一度このアプリをアンインストールするとき(帰りをお待ちしております)
(3) スマートフォンを機種変するとき(エクスポート/インポート機能として使用。データ移行が可能)
(4) 別の誰かに自分のカタログをあげたいとき(エクスポート/インポート機能として使用)
バックアップの対象は、品物、カテゴリ、メモのデータのみで、各画面の設定情報(メモ表示のタイプやソート順など)は保存されません。
他にも注意事項がありますので、3.注意事項をよく読み、その内容を理解してからこの機能を使用してください。
それでは早速やってみましょう。
1.バックアップ
|
| メニュー画面 |
メニュー画面でMenuキーを押し、「バックアップ/リストア」を選択してください。
|
| バックアップ/リストアダイアログ |
「バックアップ/リストアダイアログ」が表示されます。
最初は「前回のバックアップ時刻」が空欄になります。
では「バックアップ」ボタンを押してください。
確認ダイアログが表示され、「OK」ボタンを押すとCSVファイルを書き出します。
CSVファイルは、「SDカードのルート/ymgcsng/shp.csv」というパスで作られます。
SDカードのルートは、お使いの機種によって「/sdcard」だったり「/mnt/sdcard」だったりします。
最初は「前回のバックアップ時刻」が空欄になります。
では「バックアップ」ボタンを押してください。
確認ダイアログが表示され、「OK」ボタンを押すとCSVファイルを書き出します。
CSVファイルは、「SDカードのルート/ymgcsng/shp.csv」というパスで作られます。
SDカードのルートは、お使いの機種によって「/sdcard」だったり「/mnt/sdcard」だったりします。
2.リストア
|
| バックアップ/リストアダイアログ |
先程と同様にメニュー画面から「バックアップ/リストア」メニューを選び、「バックアップ/リストアダイアログ」を表示してください。今度は「前回のバックアップ時刻」に先程の時間が表示されているはずです。
では「リストア」ボタンを押してください。
確認ダイアログが表示され、「OK」ボタンを押すとCSVファイルを読み込みます。
読み込みが終わると、データがバックアップ時点のものに戻ります。
では「リストア」ボタンを押してください。
確認ダイアログが表示され、「OK」ボタンを押すとCSVファイルを読み込みます。
読み込みが終わると、データがバックアップ時点のものに戻ります。
3.注意事項
(1) バックアップの対象は品物、カテゴリ、メモのデータのみで、設定情報は保存されません。
(2) 同名のカテゴリは同じカテゴリとして統合されます。
同じ名前のカテゴリをどうしても使いたい場合は、バックアップ前に一度別名に変えて、リストア後に元の名前に戻してください。
(2) 同名のカテゴリは同じカテゴリとして統合されます。
同じ名前のカテゴリをどうしても使いたい場合は、バックアップ前に一度別名に変えて、リストア後に元の名前に戻してください。
4.(上級)編集してインポート
バックアップファイルはCSVファイルなので、CSVエディタやテキストエディタで編集できます。
ですので、多くのアイテムを一括で登録したい場合、アプリから1つ1つ登録するよりも、CSVファイルを編集したほうが恐らくずっと楽にできます。
ただし、手作業でのデータ編集はデータの不整合を引き起こすことがあり得るため、CSVファイルを編集するときは細心の注意を払ってください。
○手順
(1) 「SDカードのルート/ymgcsng/shp.csv」のファイルをPC等に送ってください。
(例えば、PCとスマートフォンファイルの同期ソフトを使う、「アストロファイルマネージャ」などのファイル管理アプリでファイルを送信、など)
(2) PCでCSVファイルを編集してください。
※エンコードがUTF-8なので、Excelでは文字化けします。
他のCSVエディタを使用するか、もしくはExcelを使うならば次の手順で開いてください。
(i) ファイルの拡張子を.csvから.txtに変更する
(ii) Excelの「ファイル」メニュー→「開く」で開く
(iii) テキストファイルウィザードが立ち上がるので、そのまま「次へ」ボタンを押す
(iv) 区切り文字で「カンマ」のチェックボックスをONにして「完了」ボタンを押す
ただし、ExcelではCSV形式で保存するとエンコードがSJISになるので、テキストエディタなどでエンコードをUTF-8に変換し直す必要があります。
(3) 編集したファイルをAndroid端末に送信し、「SDカードのルート/ymgcsng/shp.csv」に置いてください。
※(2)でファイルの拡張子を.txtに変更していた場合、.csvに直してください。
○各項目について
○注意事項
(1) カラムの並び順は固定なので、入れ替えないでください。
(2) 先頭1行目はヘッダーで読み飛ばします。(ただし、カラム数のチェックはします)
1行目を消さないでください。
(3) 品名が無かったりカラム数が異なったりして、読み込めなかった行は現在警告が出ません。
アプリで各品物が登録されているかチェックするか、もう一度バックアップを取って比較するなどして、確認してください。
ですので、多くのアイテムを一括で登録したい場合、アプリから1つ1つ登録するよりも、CSVファイルを編集したほうが恐らくずっと楽にできます。
ただし、手作業でのデータ編集はデータの不整合を引き起こすことがあり得るため、CSVファイルを編集するときは細心の注意を払ってください。
○手順
(1) 「SDカードのルート/ymgcsng/shp.csv」のファイルをPC等に送ってください。
(例えば、PCとスマートフォンファイルの同期ソフトを使う、「アストロファイルマネージャ」などのファイル管理アプリでファイルを送信、など)
(2) PCでCSVファイルを編集してください。
※エンコードがUTF-8なので、Excelでは文字化けします。
他のCSVエディタを使用するか、もしくはExcelを使うならば次の手順で開いてください。
(i) ファイルの拡張子を.csvから.txtに変更する
(ii) Excelの「ファイル」メニュー→「開く」で開く
(iii) テキストファイルウィザードが立ち上がるので、そのまま「次へ」ボタンを押す
(iv) 区切り文字で「カンマ」のチェックボックスをONにして「完了」ボタンを押す
ただし、ExcelではCSV形式で保存するとエンコードがSJISになるので、テキストエディタなどでエンコードをUTF-8に変換し直す必要があります。
(3) 編集したファイルをAndroid端末に送信し、「SDカードのルート/ymgcsng/shp.csv」に置いてください。
※(2)でファイルの拡張子を.txtに変更していた場合、.csvに直してください。
○各項目について
| 項目 | 入力形式 | 備考 |
| 品名 | テキスト | 必須。空欄の場合、その行は無視される |
| 買い物メモに追加 | 半角数字 | 買い物リストに表示するなら「1」 |
| 常備 | 半角数字 | 在庫管理するなら「1」 |
| 在庫状況 | 半角数字 | ○なら「2」、△なら「1」、×なら「0」 |
| 購入済み | 半角数字 | 買い物リストでチェック済みにするなら「1」 |
| デフォルト位置 | 半角数字 | カテゴリ内での順番を0から |
| 目安価格 | 半角数字 | |
| 場所 | テキスト | |
| 場所のデフォルト位置 | 半角数字 | ソート指定しなかった場合の場所の順番を0から。同じ場所で異なるデフォルト位置がある場合は、最初のものが使われる。指定しない場合は最後尾。 |
| 有効期限 | 半角数字、「/」 | 年2桁/月2桁/日2桁 |
| メモ | テキスト | |
| ワンメモ | テキスト | |
| カテゴリ | テキスト | 空欄の場合「***」になる |
| カテゴリのデフォルト位置 | 半角数字 | ソート指定しなかった場合のカテゴリの順番を0から。同じカテゴリで異なるデフォルト位置がある場合は、最初のものが使われる。指定しない場合は最後尾。 |
○注意事項
(1) カラムの並び順は固定なので、入れ替えないでください。
(2) 先頭1行目はヘッダーで読み飛ばします。(ただし、カラム数のチェックはします)
1行目を消さないでください。
(3) 品名が無かったりカラム数が異なったりして、読み込めなかった行は現在警告が出ません。
アプリで各品物が登録されているかチェックするか、もう一度バックアップを取って比較するなどして、確認してください。
登録:
投稿 (Atom)